Posts

Resolving PS1 Error: Enabling Angular Commands in PowerShell

Image
If you get this error while running the ng-script in Powershell:  Error: ng : ….\npm\ng.ps1 cannot be loaded because running scripts is disabled on this system. For more information, see about_Execution_Policies at https:/go.microsoft.com/fwlink/?LinkID=135170.LinkID=135170…….. Few Steps to follow: Step 1:  Open your terminal and type the below syntax: set-ExecutionPolicy RemoteSigned -Scope CurrentUser This command set the policies for the current user. Step 2:  Now the second command is: Get-ExecutionPolicy After running this command, it will show “RemoteSigned”. If the RemoteSigned message is received then the problem is resolved. Step 3:  To view the Policy, we need to run the below command: Get-ExecutionPolicy -list The policies are: We can see CurrentUser policy changes to RemoteSigned. We have successfully solved the problem. Now try to run the “ ng version ” angular command in the terminal. Inside the Powershell terminal, the ng command is working. Conclusion By following the a

Converting Nested JSON to CSV in Node.js: Dynamic Field Handling

Image
Introduction: In data processing and analysis, it's often necessary to convert JSON data to CSV format for easier manipulation and compatibility with various tools. While there are multiple libraries available for this task, handling nested JSON objects with varying fields can present a challenge. In this blog post, we'll explore how to convert nested JSON to CSV using Node.js, while dynamically handling fields that may vary between different JSON files. Table of Contents: 1. Understanding the JSON Structure 2. Setting Up the Environment 3. Reading and Parsing the JSON File 4. Dynamic Field Determination 5. Converting JSON to CSV 6. Writing the CSV Output 7. Error Handling and Edge Cases 8. Conclusion and Next Steps Section 1: Understanding the JSON Structure In this section, I have provide an overview of the JSON structure we'll be working with. I will explain the hierarchy of objects and arrays, emphasizing nested objects and fields that may differ across files. Example:

Validating Date of Birth in Angular Reactive Form: Best Practices and Examples

Image
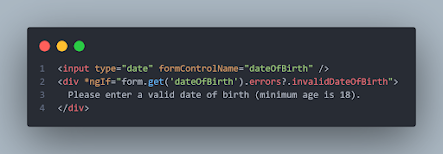
In your HTML file: You have an input field of type "date" with the formControlName "dateOfBirth" . Below that, you have an <div> element with a *ngIf directive to display an error message if the "dateOfBirth" form control has the "invalidDateOfBirth" error. In your TypeScript file: You import the necessary dependencies: FormControl, FormGroup, and FormBuilder from '@angular/forms' . Then, you define a FormGroup named "form" in your component. In the constructor, you inject the FormBuilder and use it to create the form group. The "dateOfBirth" form control is initialized with an empty string as its initial value and a custom validator function named "validateDateOfBirth" . The "validateDateOfBirth" function takes a FormControl as a parameter. It retrieves the value of the control, which is the date of birth entered by the user. It then calls the "calculateAge" function to

Understanding Node.js Event Emitter: A Powerful Event Handling Mechanism

Image
Introduction Event-driven programming is a popular paradigm that allows programs to respond to events or triggers asynchronously. In Node.js, the EventEmitter class from the core events module provides a powerful mechanism for implementing event-driven programming. This article will explore the EventEmitter class, its features, and how to utilize it effectively in your Node.js applications. What is the EventEmitter? The EventEmitter class is a fundamental part of Node.js and serves as the backbone for event handling. It enables you to define and emit custom events, as well as register event handlers to respond to those events. The EventEmitter follows the observer pattern, where objects (event emitters) maintain a list of listeners (event handlers) and notify them when an event occurs. Getting Started To begin working with the EventEmitter , first, ensure that you have Node.js installed on your system. The events module, including the EventEmitter class, comes bundled with Node.js

Convert JSON to CSV with Node.js using readFileSync

Image
  I have to convert some JSON format files to CSV format to read or access them properly from MS-Excel. You are able to see I split my VS-code screen and on the left side, you can see the code that I have used for conversion, and on the right part, you will get the JSON file that we want to convert it. In the terminal below, you can view the logs as “CSV file created successfully”. So let’s go step-by-step to get the same result as mine. There are a few pre-requisites, they are as follows: a. Nodejs installed on your local machine —   https://nodejs.org/ Install packages “ json2csv”  using the following command: $  npm install json2csv npm install json2csv Additionally, you don’t need to install any packages specifically for the built-in fs (file-system) module since it is a part of Node.js and comes pre-installed with it. You can directly use it like this as shown below: const json2csv = require ( 'json2csv' ). parse ; const fs = require ( 'fs' ); The first line impo

Angular Routing Made Easy: Navigating to Specific Components with Examples

Image
   Introduction: Routing is a fundamental feature in Angular that allows for the creation of single-page applications with multiple views. In this article, we will explore how to navigate to a specific component within an Angular application. We'll cover the implementation of click events in the first component and demonstrate how to seamlessly route to different sections of the second component. By the end, you'll have a solid understanding of Angular routing and component navigation. Prerequisites: To follow along with the code examples in this article, make sure you have a basic understanding of Angular and have a development environment set up. 1. Setting up Routes: First, we need to configure the routes in our Angular application. Open the app-routing.module.ts file and define the routes for both the first and second components. Here's an example: 2. Implementing Click Event in the First Component: Next, let's focus on the first component, where the click event wil